Even though my son is 15 months old and considered out of the direct line of fire for SIDS, I'm still nervous about having thick blankets in his crib. Also, he kicks them right off. Last year, we used regular sleeper sacks, but he outgrew them for this year. Plus, this active toddler needed his feet free.
Unfortunately, I do not have $20 a pop for the store-bought ones. I whipped up this pattern and tutorial, did some smart shopping at Joann Fabrics and made these for very little. I got my fleece on sale for $3.99 a yard, bought a zipper and some black ribbed knit. Since the ribbing for the knit runs crosswise, you end up with a length of it. So I bought black and made sure all of my three fleece fabrics would go with that one piece of ribbed knit.
 Here is just one example of my fantastic photography skills. You'll be treated to many more throughout this tutorial.
I have added a size large to this tutorial and suggested a few changes throughout. If I get around to sewing another one, I'll put some photos. I whipped this up and sewed one quickly, so I apologize if it's not a perfect pattern, but I promise it will do the job. I'm just very overwhelmed with work right now.
Supplies, 1 sleeper sack:
- 1 yard of fleece (either size)
- 1 18" zipper (size small) or 22" zipper (size large) that coordinates
- 2 pieces of ribbed knit that are at least 7" wide (size small) or 9" wide (size large) and 4" tall
- Obvious things like pins, thread, sewing machine, scissors
- Matching fold-over elastic - 1/2 yard plus a few inches just to be safe. This is totally optional and used for the armholes. Alternatively, fold over the edge of the armhole and stitch.
Tips:
- Use a 1/2" seam allowance, except where noted.
- Fleece is easier to sew with a longer stitch length. My machine goes from 0-4 and I found that 3 worked nicely. Normally I sew on 2.
- One thing I forgot to mark on the small pattern was the grainline. Grainline is parallel to the straight edges (front edge and center back).
Finished measurements for size SMALL (I made this for a 15-month-old of average size. ETA: My son is going on 22 months and still fits in these just fine.):
- Center front length, neckline to crotch - 21"
- Center back length, neckline to crotch - 23"
- Length in front from bottom of leg band to shoulder - 27"
- Width from shoulder edge to shoulder edge - 15"
Finished measurements for size LARGE - I'm sorry, but I don't have these. My son is now 5, so I won't be making another of these. If someone wants to send me the measurements after making one to share with others, that would be wonderful!
Pattern:
Like many downloadable, print-yourself patterns, you will print this on several (12-size small, 16-size large) pieces of regular paper and then tape them together according to the markings. I am not very high-tech at making the pattern -- I just drew it, no computer. To make it print correctly, the pages have a border. You'll cut off at each of the border lines and tape the pattern together at the letters and marks. I have also numbered the pages. Here is a layout of the pages taped together:
After taping your pages together to form the entire pattern pieces, cut them out.
NOTE ON SIZE SMALL: WAIT. Don't cut them out yet. I have edited this to add that throughout using the ones I made, I have often wished the leg holes were a little wider. I do not have time to redo the pattern, so you might want to simply draw the leg openings a little wider and also cut your ankle ribbing a little bigger. I would just do this on the inside of the leg and adjust the curve to meet with your new line. Ours functioned fine and I have continued to use them, but I just think they'd be better with a little more room there. After deciding if you want to adjust this portion of the pattern, cut out your pieces.
Size
LARGE is already adjusted with wider leg holes.
I know I'm not an expert pattern maker. I just did the best I could to throw something together. No doubt many of you can come up with a better way to put it together or improve the pattern, so feel free to make changes as you go!
Print these PDF pattern pieces. Sorry that they are all separate. Let me know if you have trouble with any of them. There is a 1" square gauge on one of the pieces so you can be sure they printed correctly.
For some time, I've had trouble with PDFs on here and asked people to email me to get them. However, I'm hoping I've solved that problem now, so hopefully you can access the patterns below.
Pattern, size SMALL
Pattern, size LARGE
Cutting layout:
This is the cutting layout. It's pretty basic. The back is cut on the fold and you cut two of the front piece.
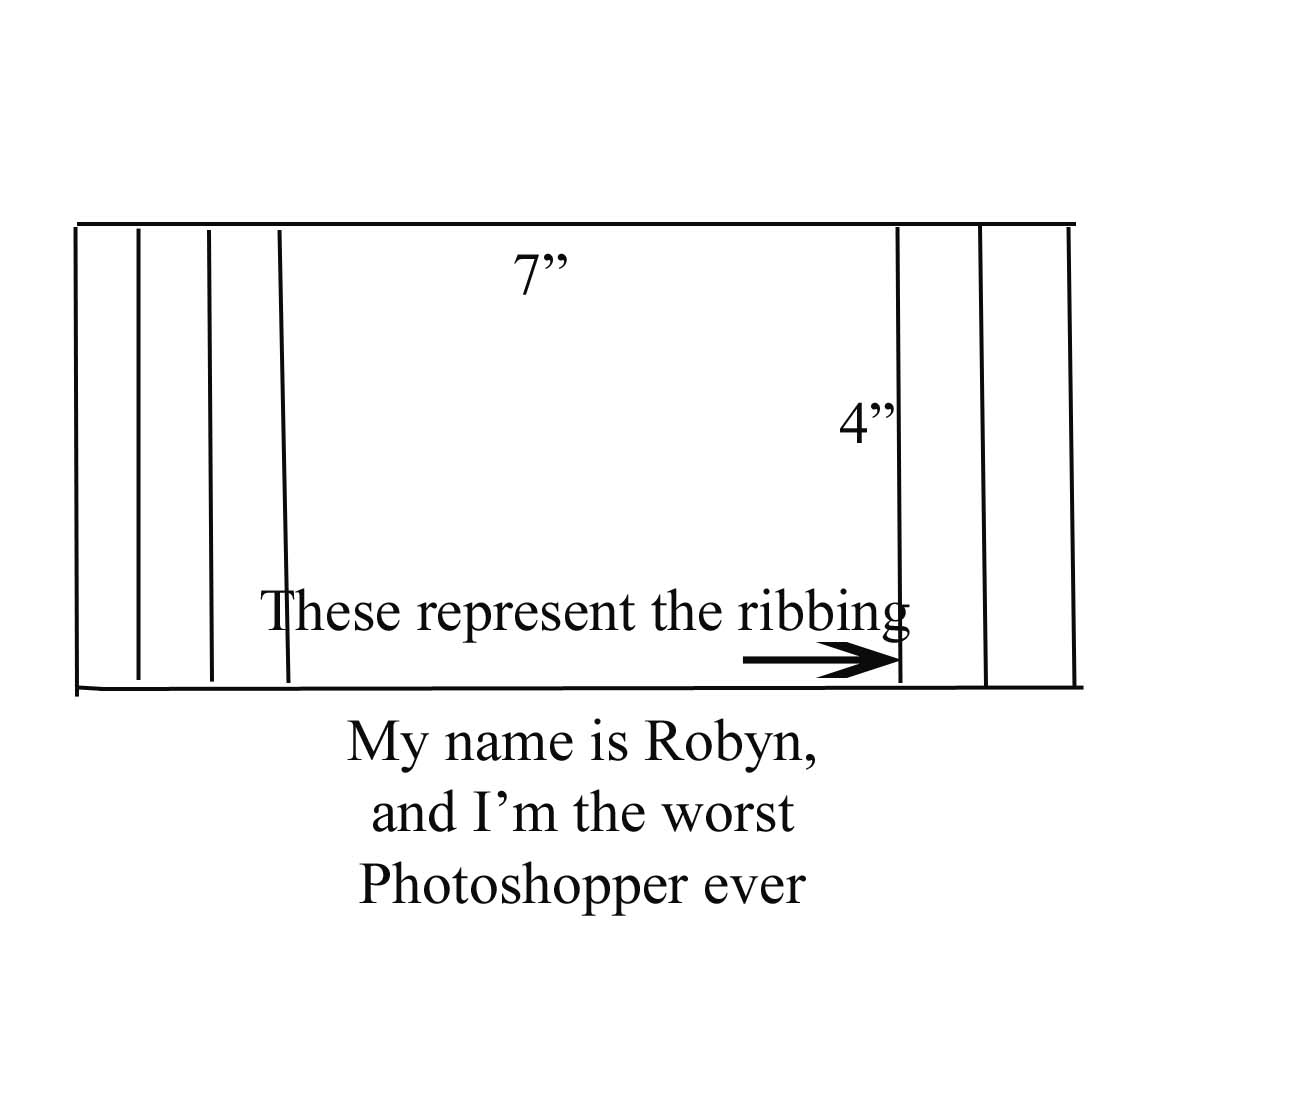
For the ribbing, you need two pieces 4"x7"
NOTE: 4"x9" for size LARGE. I had trouble using words to describe how the ribbing should be oriented, so I made you a really helpful drawing. I'm not kidding when I say that the only things I can do in Photoshop are draw lines and add text.
Instructions:
Take one of your front pieces and your zipper. You might like to press your zipper a little to smooth it out. Lay your zipper next to your front edge, lining the top of the zipper tape with the top of the straight edge. Make a mark just above the zipper stop (I also made a mark on the pattern piece that you can use). That's where the arrow pointing up is. From that point down, sew the two front pieces together, right-sides together. You will add the zipper in the next step.
Pin your zipper right-sides together with one of your front pieces. Since it's face-down in the picture below, I'm working with the side of the zipper tape that's closest to the edge of the fabric.
Here is a zoomed-out view.
Using your zipper foot, sew your zipper to the fabric. I realized later that I was doing this sort of the way you'd insert an invisible zipper, even though this is a regular zipper. It worked just fine. I'm not sure why I did it this way. If you prefer the standard way, that's just fine.
Flip your zipper around so that you can see how pretty it will look.
Now lay this piece right-sides together on your other front piece and align the other side of your zipper tape to the front edge of that piece. It's hard to see in the picture below. Sorry about that.
Sew the other side of the zipper tape to the second front piece. Turn your whole front piece over and press. It will look like the picture below. In this picture, I'm top-stitching to secure the area around the zipper and prettify it.
Now you'll sew your shoulder seams. Place this newly finished front piece right-sides together with the back piece and sew along the top of the shoulders.
I chose to trim my seams with pinking shears. Most fleeces won't really ravel or shed, but some do. This one doesn't, but I thought it would be nice to reduce bulk and make the seams look neater.
Next, sew along either side of the sack. With right-sides together, pin and sew from bottom of the armhole to the foot opening. Use a 1/2" seam allowance, but as you round the curve to the edge of the foot opening, reduce your seam allowance to 3/8". I should have done a better job on this part of the pattern, but this will allow for a roomier foot opening. It's probably no big deal if you go ahead and use a 1/2" allowance, though.
In the photo below, the flat area on the right is the foot opening. The pinned area is the side of the sack.
NOTE: Size LARGE is already adjusted, so use a 1/2" seam allowance and disregard the part above.

Now sew the area between the foot openings, shown pinned together below. (In other words, you are not looking at the neck opening below. The sack is upside down in this picture.) Sew between the openings as described above, 3/8" right by the openings, merging into 1/2" in the rest of the seam. Sorry if that's confusing. If it is, then just do 1/2" from start to finish. I'm sure the leg holes will still be roomy enough.
I'm switching fabrics on you now. For the neck opening and the armholes, simply turn under a little bit of fabric and stitch. Like I said, fleece doesn't ravel and usually doesn't shed, so you shouldn't need to hide the edge of it inside a seam or anything. Just one turn and stitch is sufficient.
If you want to use
fold-over elastic for a nicer finish, simply cut out a piece the size of the armhole (measure after sewing -- I'm sorry but I'll have to find the measurements and add later) plus a seam allowance on either end. Sew ends together, right side together, forming a circle. Lining the seams up, fold over the raw edge of the armhole and stitch in place.
Now we'll add the cuffs to the foot holes. First step is on the right in the picture below. Fold your cuff in half with right-sides together and sew along the 4" side. Leave it this way and then fold in half with wrong-sides together so you get the object on the left in the photo below. The raw edges are at the bottom and the top is a folded edge.
Make sure your sleep sack is right-side out. Place the cuff over the foot opening, aligning all raw edges. Pin and stitch. You can do smaller than a 1/2" seam allowance if you like. Maybe 3/8".
Flip the cuff down and repeat on the other side.
If you're lucky, you'll have a cute little helper to get in your way. If you don't have a cute little helper, this project can probably be whipped up in an hour or so.