Tuesday, November 27, 2012

I drew a girl!

I took my first fashion design drawing class that I won at The Designer's Lounge today. I went in unable to even draw a stick figure and came out with this!

It's a great little place where you can get one-on-one instruction, and it turns out the owner and I went to elementary and middle school together! Small world, huh?

Sunday, November 25, 2012

Learning to draw

There's a local business called The Designer's Lounge. It's a place where you can learn fashion design skills like pattern drafting and draping, along with sewing and other things.

Boy do I wish this had been around when I was taking such classes in Santa Fe. Would have saved me a long trip and supported a local business, as well.I had never been to this place (I did make it over there once but they were closed, darn the luck), but I was on the mailing list and followed it on Facebook, etc.

I tell you, due to time constraints, I often delete emails from companies unread. But for local shops, I try to take a look. This newsletter announced an anniversary giveaway, so I entered. And I won! I won five hours of free instruction on the topic of my choice.


After a consultation with the owner, Teresa, I decided on fashion illustration. I have explored draping and flat pattern before, though I don't remember much. I thought that since I don't have much time right now for "homework," I'd probably be better off not getting involved in a garment right now.I have never been able to draw anything. At all. My dad and brother were natural-born artists. Not me. I still draw about on the level of stick figures, at best. But Teresa says anybody can learn, so this will be really fun for me. I have my first lesson on Tuesday.

Let's see what my starting point is. This is a photo from a few years ago where I drew Mark and he drew me. I never thought anyone could be worse than I am at drawing, but there he is! I drew the picture on the left. Incidentally, our 2-year-old son instantly knew who it was when I came across it the other day in a drawer, so there must be some resemblance, right?


I'll give you an update after I do some learnin'!

Tuesday, November 6, 2012

Friday, November 2, 2012

What the Truck?

I think the fact that he calls the color gold "goldfish" is so stinkin' cute.

Thursday, November 1, 2012

Pooh-poohing Halloween

My kid is the only one who hates Halloween. I watched with some jealousy as friends posted pics on Facebook of their happy and cooperative costumed tots.

Every time we mentioned "Halloween" or "costume," he got mad and screamed that he didn't want to. "No not! Do not! Stop it mommy!"

So I didn't prepare a costume. But daddy insisted (I had to work last night) and so I went last minute to the children's resale shop and got the only costume left in his size.


If he wasn't mad before ... Well now he's a stupid Pooh bear dressed as a pumpkin. Barf.

Needless to say, he hated trick-or-treating at the mall and only showed interest in the automatic hand sanitizer dispenser.

Cleanest Pooh bear paws in the state! Come to think of it, that morning he was licking honey and saying, "Mmmmm. Yummy!" just like good ol' annoying Winnie would.

Saturday, October 27, 2012

Hello, 2012

Guess what? I finally have a smart phone. For all the web stuff I do, it's kind of ridiculous, but my non-tetchy husband felt it was an unnecessary expense. Can you imagine that?!

So this is a test post using the mobile app on my phone. My mom, Brock and I went to McCalls pumpkin patch today. Brock was a total sourpuss all day.

The funniest part of this post is that I posted it onto the wrong blog and had to come onto the real computer to transfer it. So maybe I'm a bit more 2010 than 2012. I got this now.

String quilt update

Someone contacted me the other day wanting to know the status of my string quilt. Yeah, I was just as surprised as you are that I still have anyone who reads this blog. I've been a little neglectful lately, but that's because I have so little time to craft, or to think of anything clever to write about. I've also started a blog (Prominent Butt) that's about my fitness/health journey. That journey is also a bit time consuming! I've quickly fallen into neglecting that blog, as well.

Well, due to popular demand (by one person), here is my string quilt top. That's as far as I've gotten. I have no time for personal sewing. I am (was?) making this for the mother of a baby that died from a brain tumor, but it's just not good.


First of all, now that I'm looking at it, I don't understand why it's so square. It should probably have another set of squares on the bottom, but that requires making 12 more blocks. And I'm out of fabric. Still, it would work as a lap quilt.

As you can see, using the white strips in the center of each block creates a more distinct visual effect of squares throughout the quilt. Unfortunately, none of my white strips met up nicely in the corners. Pretty much all of my corners look like this:


Actually, that's one of the better ones.

To make matters worse, the whole thing is warped. That's what happens when you sew in a hurry and do a sloppy job and then try to force it to fit together in certain places.


It just doesn't lie smoothly. So I know if I try to quilt it, it will just pucker up and get a bunch of tucks and folds all over the surface.

So that's where it stands now. I am just not sure I'll try to finish this one due to all the bad sewing. I would like to give the mother of this baby a gift to honor his short life, but this is an embarrassment.

I'm going to make you look at a whole bunch of pictures of my kid

Because we both work at a newspaper, my husband and I are lucky to know lots of professional photographers. One of them came over recently to shoot some pictures of Brock. He's now 2 years and 3 months old, though these were shot over a month ago. He's certainly become a contrary one. He battles me on everything and I think his favorite phrase is, "Stop it! Do not! No mommy! I don't like it!" OK, that's four phrases. They are very common in our house.

Here are the photos by Roberto E. Rosales


Saturday, August 11, 2012

String quilt

I've been working on this quilt for a while. It's for someone special, but I won't say who yet. This type of quilt is called a string quilt.
If you'd like to see how it's done, I'll show you! Start by choosing a bunch of random fabrics and cutting strips of varying widths. Mine ranged from .5" to maybe 3".

It uses paper piecing, which I was sure would be really complicated. I really ended up loving the method. You start with a square of paper the size you want your final blocks to be. I used old computer paper that was going to be recycled. At first I was going to make bigger blocks, but then I realized I didn't want them to be bigger than my sheets of paper or I'll have to tape sheets together. It was just easier to make them 8.5" square.
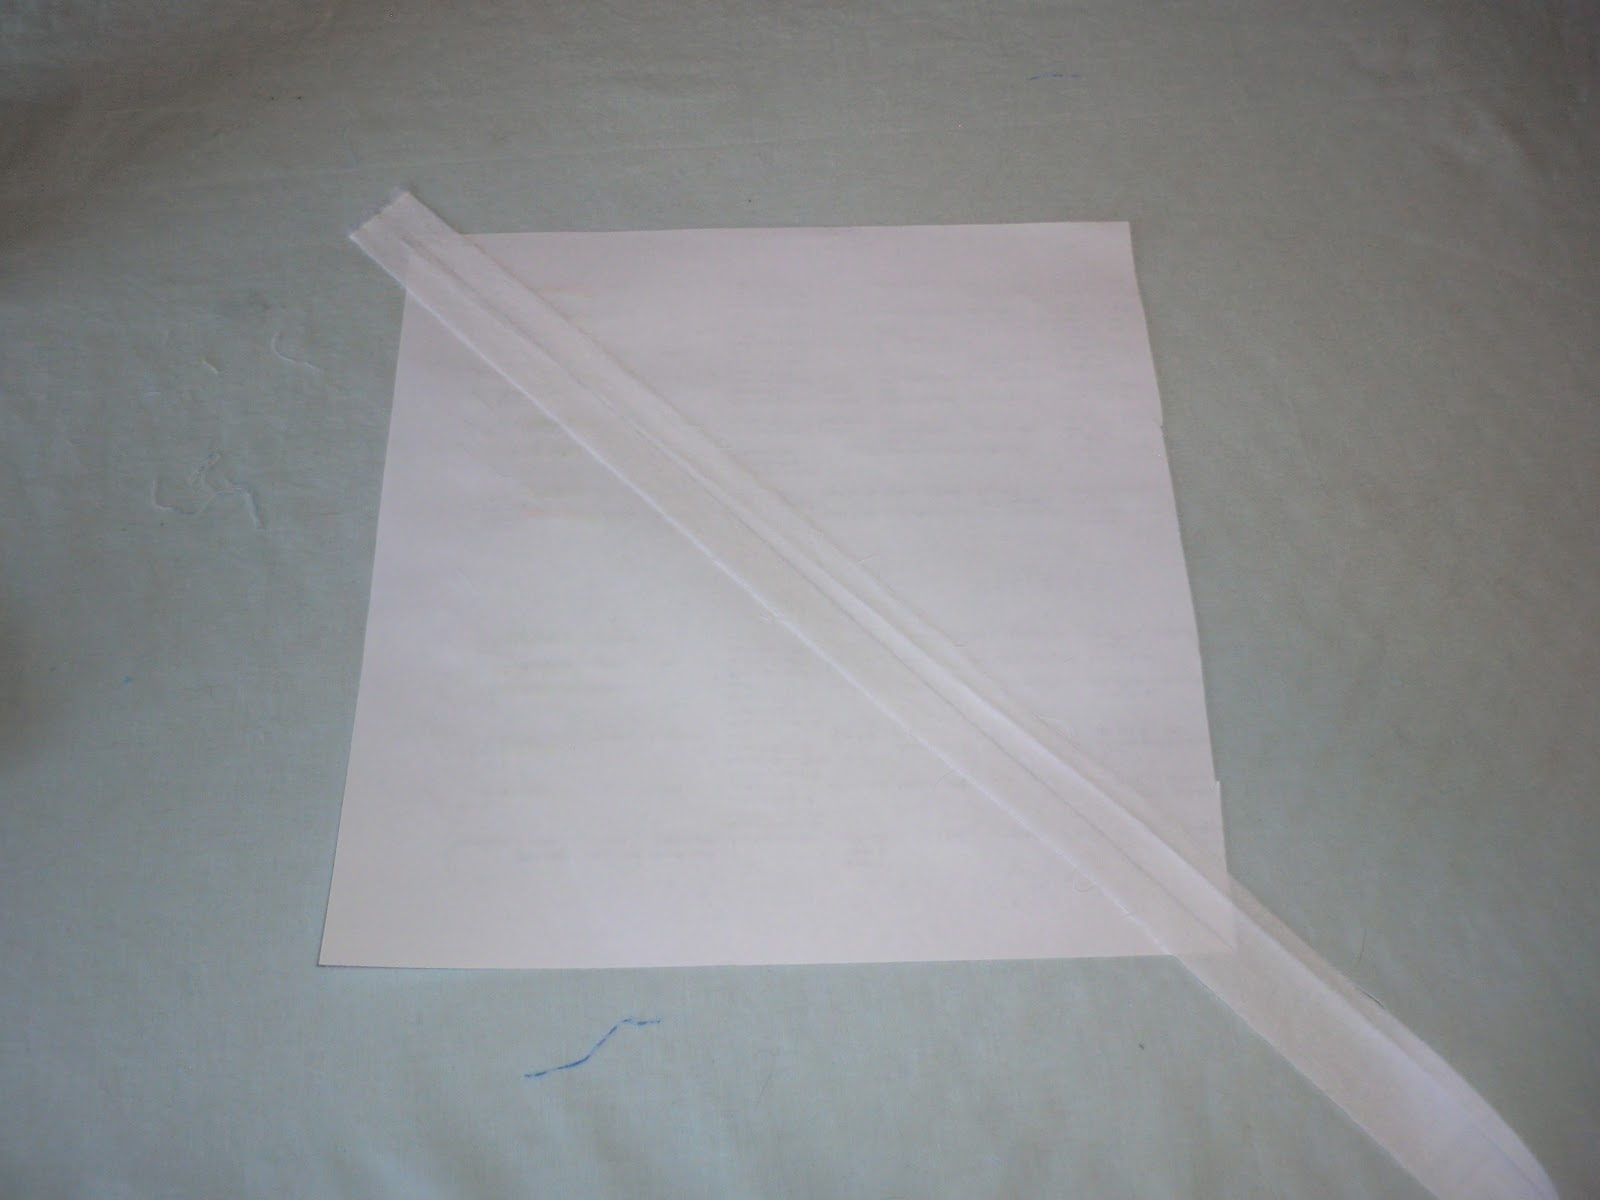
After cutting your papers into squares, draw a line on the diagonal from corner to corner.

Choosing one solid fabric that is used consistently and only on that diagonal will create a neat effect when the quilt is put together. I'll have to show you that later. I chose white. I believe these strips were 1" wide. Use a fabric glue stick to stick this first strip to the diagonal.

Randomly select a bunch of strips in differing prints and widths. Lay the first one right-side down on the white strip, with the right edges matched.

Sew a quarter inch seam allowance right through the paper. Use a small stitch length so that your paper will perforate well and you can more easily pull it off later.

Press the strip open.

Repeat with another strip on the other side of the white strip.

Add another strip to either side of those.

Keep on going until you have covered all of the paper. As you can see, as you approach the corners, you need smaller and smaller pieces. So I cut off any major excess and set it aside to use for these corners on future blocks. I barely had enough fabric for all of my blocks, so I'm glad I wasn't wasting long strips on these tiny areas.

In the end, your block will look messy, like this. Incidentally, I mostly tried not to use the same fabric twice on the same block, but here I did.

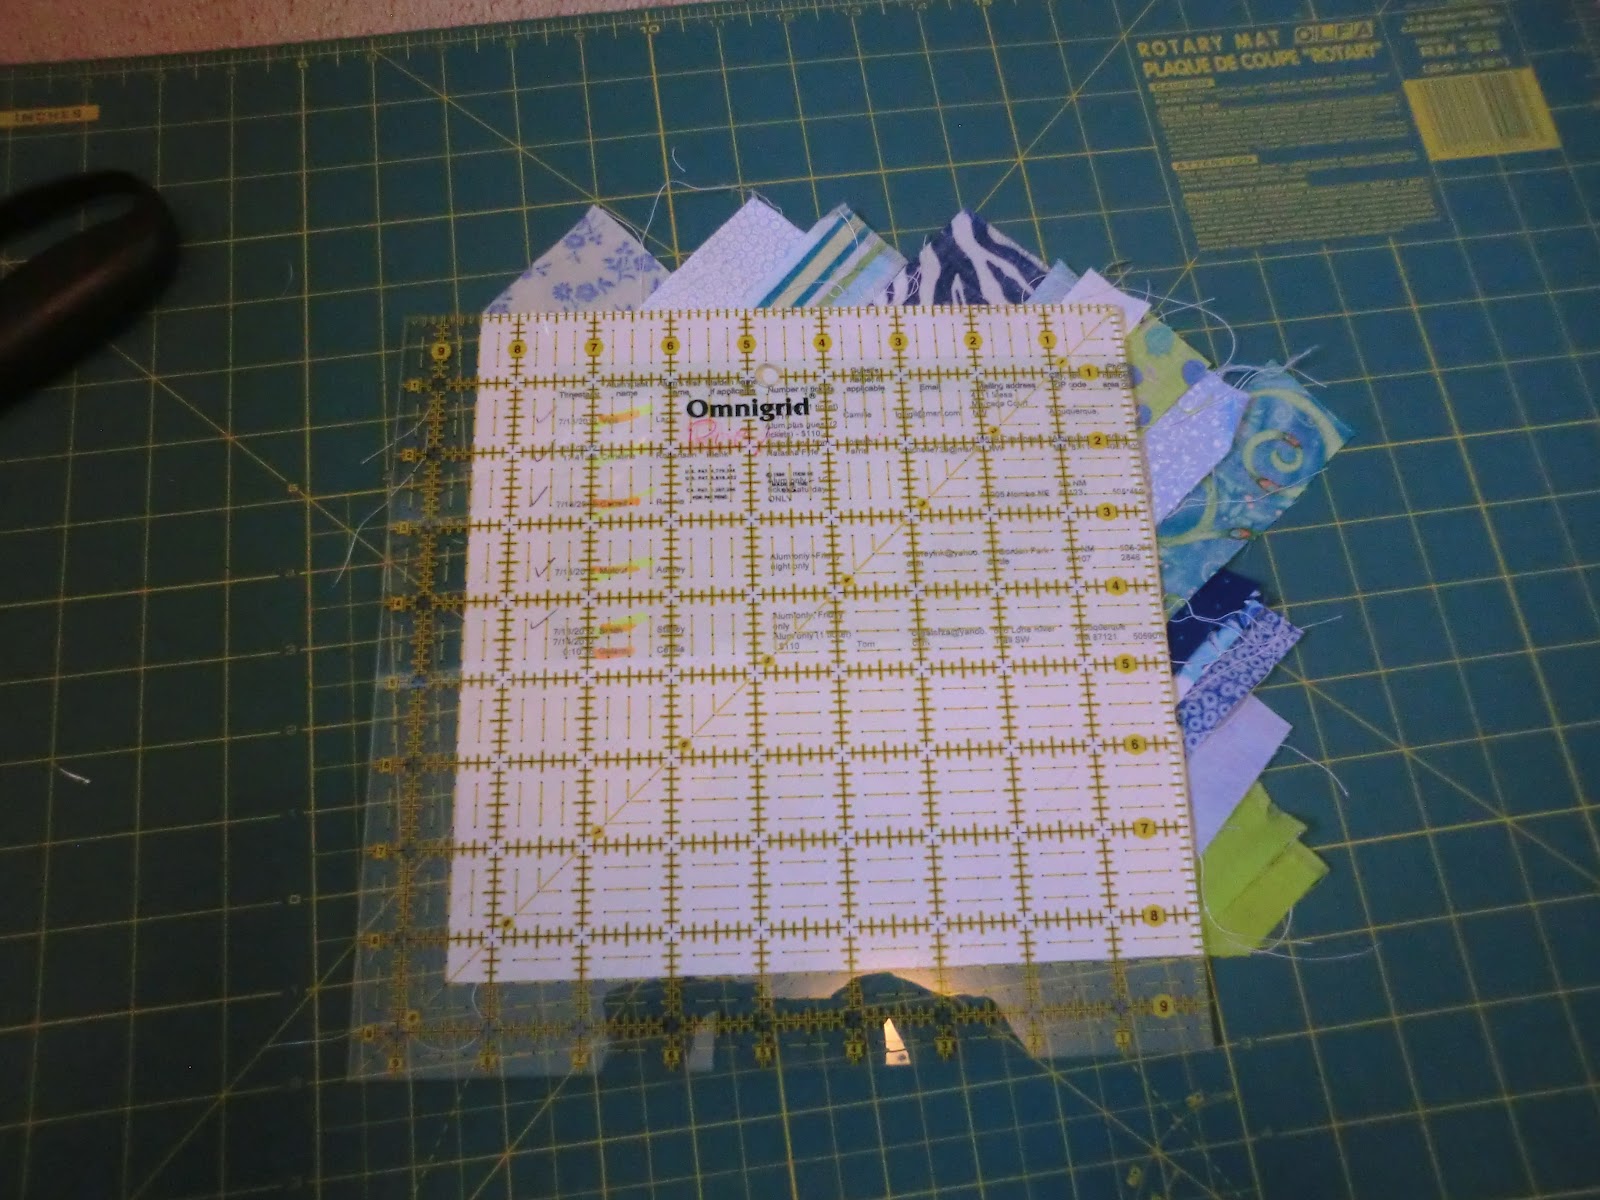
Now, to make it all pretty. Get your rotary cutter, square ruler and mat. Turn your block over so you can see the paper.

Line up your ruler so that the edges on the top and right sides match up with the edge of the paper. Use this opportunity to square it up as much as you need to.

Cut the top and right sides off.

Rotate your square and repeat.

And looky what you've got! A beautiful and perfect square. I'll show you later how to put them together to look purty. (And, yes, that's a different block than I showed above. I lost that one in the pile.)