Thursday, October 20, 2011

Tutorial: How to make a toddler sleeper sack with foot holes - 2 sizes!


Even though my son is 15 months old and considered out of the direct line of fire for SIDS, I'm still nervous about having thick blankets in his crib. Also, he kicks them right off. Last year, we used regular sleeper sacks, but he outgrew them for this year. Plus, this active toddler needed his feet free.


Unfortunately, I do not have $20 a pop for the store-bought ones. I whipped up this pattern and tutorial, did some smart shopping at Joann Fabrics and made these for very little. I got my fleece on sale for $3.99 a yard, bought a zipper and some black ribbed knit. Since the ribbing for the knit runs crosswise, you end up with a length of it. So I bought black and made sure all of my three fleece fabrics would go with that one piece of ribbed knit.


Here is just one example of my fantastic photography skills. You'll be treated to many more throughout this tutorial.


I have added a size large to this tutorial and suggested a few changes throughout. If I get around to sewing another one, I'll put some photos. I whipped this up and sewed one quickly, so I apologize if it's not a perfect pattern, but I promise it will do the job. I'm just very overwhelmed with work right now.


Supplies, 1 sleeper sack:

  • 1 yard of fleece (either size)
  • 1 18" zipper (size small) or 22" zipper (size large) that coordinates
  • 2 pieces of ribbed knit that are at least 7" wide (size small) or 9" wide (size large) and 4" tall
  • Obvious things like pins, thread, sewing machine, scissors
  • Matching fold-over elastic - 1/2 yard plus a few inches just to be safe. This is totally optional and used for the armholes. Alternatively, fold over the edge of the armhole and stitch.

Tips: 
  • Use a 1/2" seam allowance, except where noted.
  • Fleece is easier to sew with a longer stitch length. My machine goes from 0-4 and I found that 3 worked nicely. Normally I sew on 2.
  • One thing I forgot to mark on the small pattern was the grainline. Grainline is parallel to the straight edges (front edge and center back).
Finished measurements for size SMALL (I made this for a 15-month-old of average size. ETA: My son is going on 22 months and still fits in these just fine.):
  • Center front length, neckline to crotch - 21"
  • Center back length, neckline to crotch - 23"
  • Length in front from bottom of leg band to shoulder - 27"
  • Width from shoulder edge to shoulder edge - 15"
Finished measurements for size LARGE - I'm sorry, but I don't have these. My son is now 5, so I won't be making another of these. If someone wants to send me the measurements after making one to share with others, that would be wonderful!

Pattern:

Like many downloadable, print-yourself patterns, you will print this on several (12-size small, 16-size large) pieces of regular paper and then tape them together according to the markings. I am not very high-tech at making the pattern -- I just drew it, no computer. To make it print correctly, the pages have a border. You'll cut off at each of the border lines and tape the pattern together at the letters and marks. I have also numbered the pages. Here is a layout of the pages taped together:


After taping your pages together to form the entire pattern pieces, cut them out.

NOTE ON SIZE SMALL: WAIT. Don't cut them out yet. I have edited this to add that throughout using the ones I made, I have often wished the leg holes were a little wider. I do not have time to redo the pattern, so you might want to simply draw the leg openings a little wider and also cut your ankle ribbing a little bigger. I would just do this on the inside of the leg and adjust the curve to meet with your new line. Ours functioned fine and I have continued to use them, but I just think they'd be better with a little more room there. After deciding if you want to adjust this portion of the pattern, cut out your pieces.
Size LARGE is already adjusted with wider leg holes.

I know I'm not an expert pattern maker. I just did the best I could to throw something together. No doubt many of you can come up with a better way to put it together or improve the pattern, so feel free to make changes as you go!

Print these PDF pattern pieces. Sorry that they are all separate. Let me know if you have trouble with any of them. There is a 1" square gauge on one of the pieces so you can be sure they printed correctly.

For some time, I've had trouble with PDFs on here and asked people to email me to get them. However, I'm hoping I've solved that problem now, so hopefully you can access the patterns below.

Pattern, size SMALL
Pattern, size LARGE


Cutting layout:

This is the cutting layout. It's pretty basic. The back is cut on the fold and you cut two of the front piece.
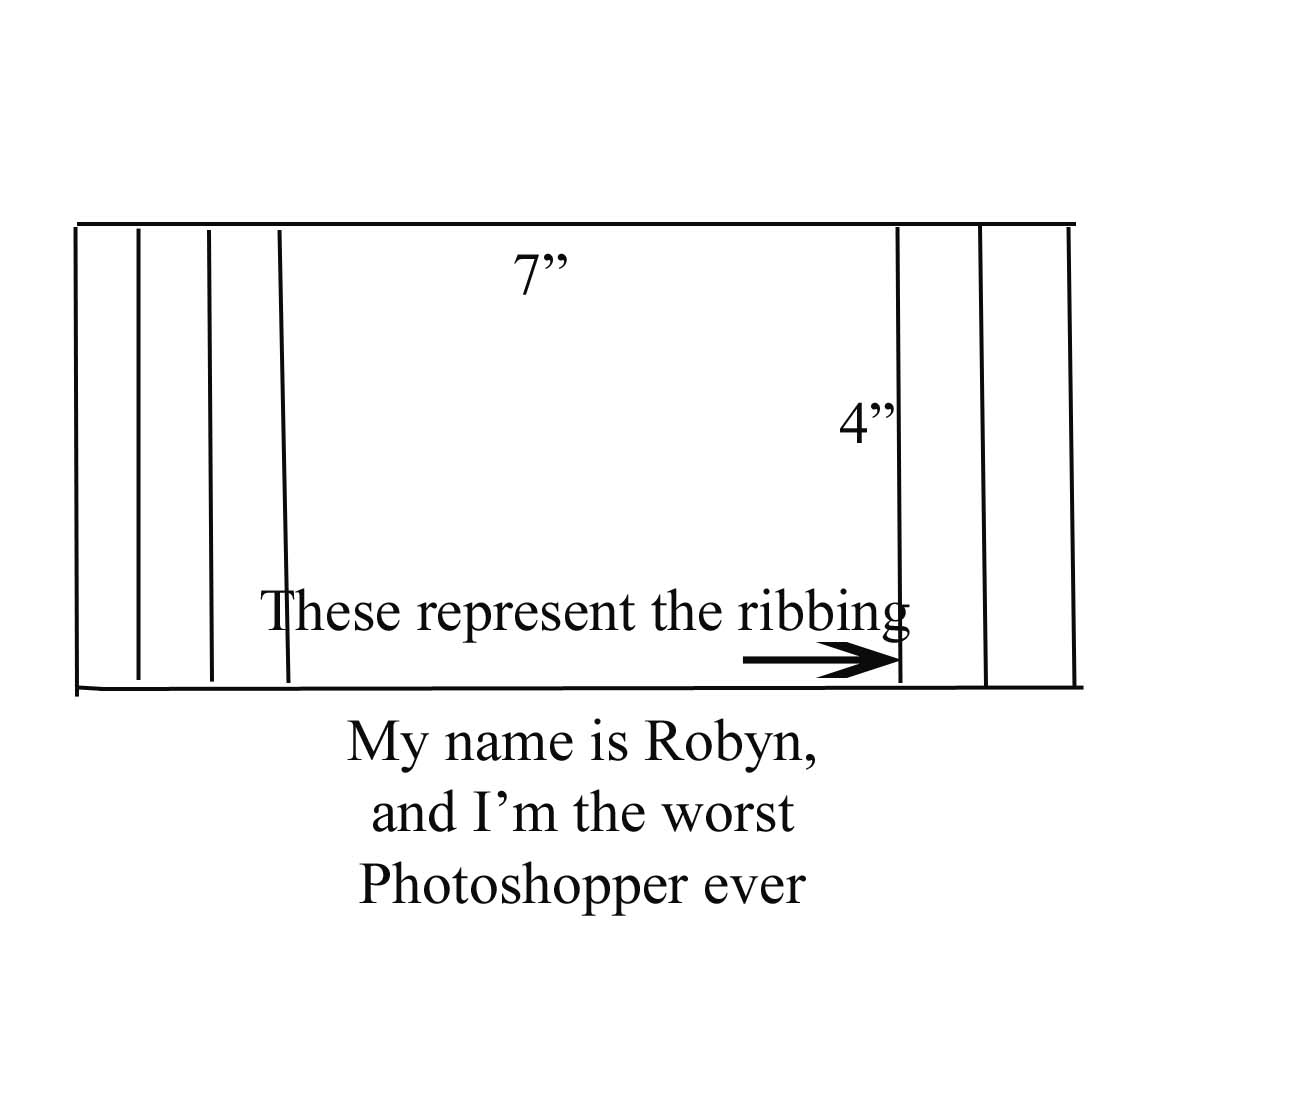
For the ribbing, you need two pieces 4"x7" NOTE: 4"x9" for size LARGE. I had trouble using words to describe how the ribbing should be oriented, so I made you a really helpful drawing. I'm not kidding when I say that the only things I can do in Photoshop are draw lines and add text.



Instructions:

Take one of your front pieces and your zipper. You might like to press your zipper a little to smooth it out. Lay your zipper next to your front edge, lining the top of the zipper tape with the top of the straight edge. Make a mark just above the zipper stop (I also made a mark on the pattern piece that you can use). That's where the arrow pointing up is. From that point down, sew the two front pieces together, right-sides together. You will add the zipper in the next step.


 Pin your zipper right-sides together with one of your front pieces. Since it's face-down in the picture below, I'm working with the side of the zipper tape that's closest to the edge of the fabric.


Here is a zoomed-out view.


 Using your zipper foot, sew your zipper to the fabric. I realized later that I was doing this sort of the way you'd insert an invisible zipper, even though this is a regular zipper. It worked just fine. I'm not sure why I did it this way. If you prefer the standard way, that's just fine.


Flip your zipper around so that you can see how pretty it will look.


Now lay this piece right-sides together on your other front piece and align the other side of your zipper tape to the front edge of that piece. It's hard to see in the picture below. Sorry about that.


Sew the other side of the zipper tape to the second front piece. Turn your whole front piece over and press. It will look like the picture below. In this picture, I'm top-stitching to secure the area around the zipper and prettify it.


 Now you'll sew your shoulder seams. Place this newly finished front piece right-sides together with the back piece and sew along the top of the shoulders.


 I chose to trim my seams with pinking shears. Most fleeces won't really ravel or shed, but some do. This one doesn't, but I thought it would be nice to reduce bulk and make the seams look neater.


 Next, sew along either side of the sack. With right-sides together, pin and sew from bottom of the armhole to the foot opening. Use a 1/2" seam allowance, but as you round the curve to the edge of the foot opening, reduce your seam allowance to 3/8". I should have done a better job on this part of the pattern, but this will allow for a roomier foot opening. It's probably no big deal if you go ahead and use a 1/2" allowance, though.
In the photo below, the flat area on the right is the foot opening. The pinned area is the side of the sack.
NOTE: Size LARGE is already adjusted, so use a 1/2" seam allowance and disregard the part above.


 Now sew the area between the foot openings, shown pinned together below. (In other words, you are not looking at the neck opening below. The sack is upside down in this picture.) Sew between the openings as described above, 3/8" right by the openings, merging into 1/2" in the rest of the seam. Sorry if that's confusing. If it is, then just do 1/2" from start to finish. I'm sure the leg holes will still be roomy enough.


 I'm switching fabrics on you now. For the neck opening and the armholes, simply turn under a little bit of fabric and stitch. Like I said, fleece doesn't ravel and usually doesn't shed, so you shouldn't need to hide the edge of it inside a seam or anything. Just one turn and stitch is sufficient.
If you want to use fold-over elastic for a nicer finish, simply cut out a piece the size of the armhole (measure after sewing -- I'm sorry but I'll have to find the measurements and add later) plus a seam allowance on either end. Sew ends together, right side together, forming a circle. Lining the seams up, fold over the raw edge of the armhole and stitch in place.


Now we'll add the cuffs to the foot holes. First step is on the right in the picture below. Fold your cuff in half with right-sides together and sew along the 4" side. Leave it this way and then fold in half with wrong-sides together so you get the object on the left in the photo below. The raw edges are at the bottom and the top is a folded edge.


 Make sure your sleep sack is right-side out. Place the cuff over the foot opening, aligning all raw edges. Pin and stitch. You can do smaller than a 1/2" seam allowance if you like. Maybe 3/8".


Flip the cuff down and repeat on the other side.


If you're lucky, you'll have a cute little helper to get in your way. If you don't have a cute little helper, this project can probably be whipped up in an hour or so. 

Sunday, September 25, 2011

Diane Kimono Dress fix

A few days ago, I posted about my Diane Kimono Dress from Serendipity Studio. You can read my pattern review and the problems that I had here.

I had intended to make an above-the-knee dress with contrast on the bottom, but I messed it up royally. It was pretty unflattering.
Here is the hideous before:


For one thing, the dress is bunched up and I just look terrible. I was feeling pretty dejected when I saw this picture.
I had to do something about that unflattering skirt, but I didn't have it in me to spend more money on it and redo the bottom. I had serged the seams already. I decided to give up on the dress concept and go for a tunic I could wear with jeans. I simply cut off some of the bottom band and rehemmed it.

Here is the after:


Oh, do I like this so much more! Much more flattering as a top. I wish I'd had this all summer! Now it's going to go and get cold on me. Eventually. For now, it's still in the 80s in Albuquerque.


The fabric is Joel Dewberry's Aviary II, which I also used to make my mom's quilt (in another colorway).

Thursday, September 22, 2011

Yarn dyeing supplies for sale

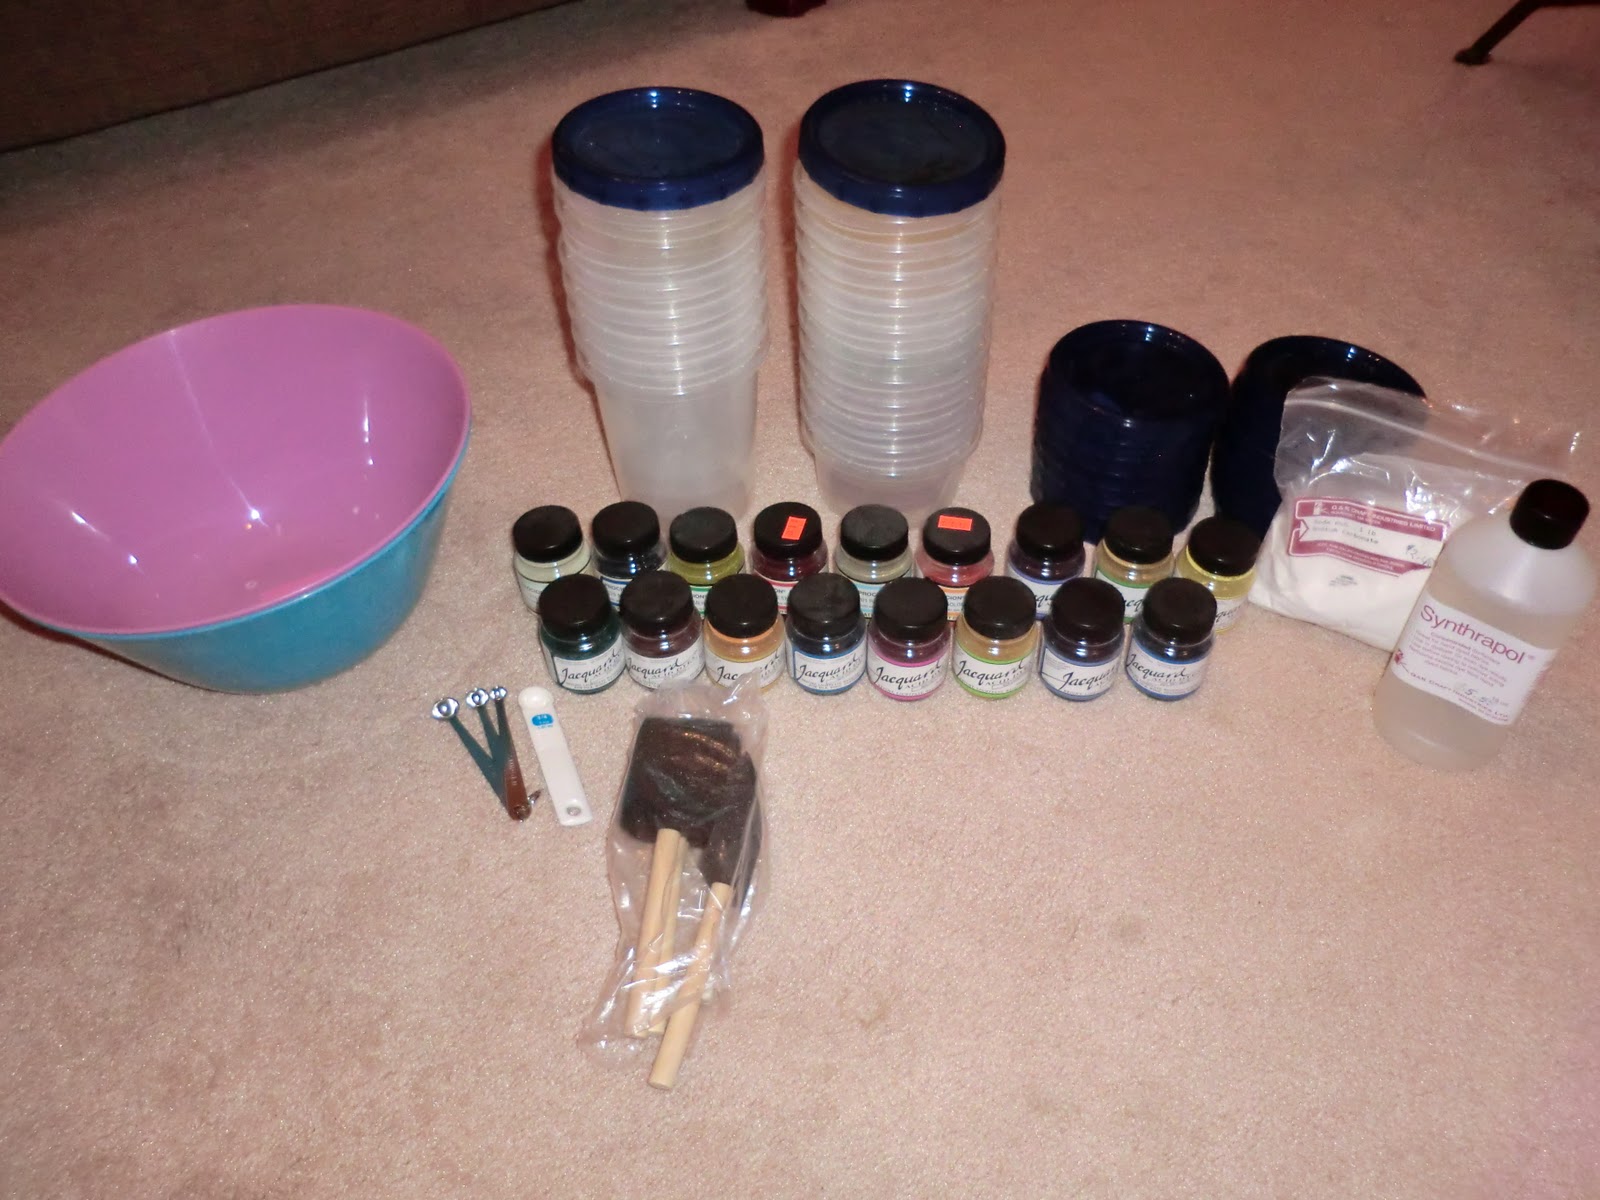
I'm selling a big lot of yarn dyeing supplies and undyed yarn. Lots of info can be found here.


The Diane Kimono Dress and a bad modeling session

 UPDATE: I have fixed this dress. See this post.

--------------------------------------------------------------------------------------------

You know what it's like to sew when you have a toddler? It means that you grab a moment when you can, you're always rushing through and you don't have time to really stop and think about what you're doing. At least, that's how it is for me because I should really be working instead. And so mistakes happen.

I decided to try the Diane Kimono Dress by Serendipity Studio. It's one basic dress with lots of length and trim options. To be honest, most of the options seemed a bit frumpy to me, but I did like the shorter version in the straight skirt (bottom right in photos below), and I thought it would be cute with tights and boots or with leggings, maybe a fitted long-sleeved tee underneath for winter.


One reason I picked this dress was because my butt is a little what I call "sticky-outy" right now and I'm also sway-backed, so I'm not really liking how dresses look on me right now. I thought the relaxed fit of this dress would be nice.

The fabric is Joel Dewberry's Aviary 2, which I got at Hip Stitch. The fabulous Suzanne suggested I use the lighter one for the main fabric and the darker for the trim. I was initially thinking the opposite, and I really like it this way. Thanks for the consultation, Suzanne.

By the way, have I mentioned that I invented the concept of yellow and gray being stylish right now? Yeah, I liked it several years ago, before everyone else did. I made these horrid socks out of yellow and gray and then decided I hated it. But now I like it again.

I have a few things to say: First, this might not be so flattering. I think in this photo, I really needed to adjust the dress and pull it down a bit. It seems bunched under my bust. Who decides to haul a kid around and do this and that before modeling for a picture and not even adjust the dress? Second, I made a mess of the bottom of the skirt. More on that below in my pattern review.


PATTERN REVIEW for Serendipity Studio's Diane Kimono Dress:

I know what you're supposed to do. You're supposed to sit down with your new pattern and read all of the instructions start to finish. I rarely do this. I was cutting my fabric out and I got rather confused about how to cut out the skirt. There are a whole bunch of options between a full skirt, straight skirt, tiered skirt, long skirt, short skirt, skirts with contrast on the bottom in any number of width, etc. But there aren't all of those options in the pattern. The cutting instructions gave no information about how to do the contrast fabric, so at first I just cut off one of the tiers and used that to cut my contrast fabric for the bottom and the top part of the skirt that was remaining I used for my main fabric.


Of course, later I realized I had this funky curved edge on the top of my contrast piece/bottom of my tunic that was going to form a very odd bottom. That's because the hem is curved and that's what I was working with instead of a straight line. I'm sure this is making no sense to you right now, but suffice it to say that I ended up hacking and cutting and praying I'd get something I could fit in. So the bottom part of my skirt is obviously rather strange. The bottom trim is too wide and cuts across me in a weird place. And it's too short.
I later found the instructions for cutting the bottom trim and the sleeve trim -- it was way toward the middle of the pattern instructions. I found this odd, since don't you usually cut everything out at the beginning? It also saved the cutting instructions for the tie until you got to that part. I would have appreciated if the pattern had a note in the cutting section referring you to these parts. It would have saved me some trouble on the skirt.
Also, the instructions for the armhole binding were lacking. It was something I figured out on my own, but I found the instructions really confusing there, too.

Now I'm wondering if I should buy some new fabric for the upper skirt and do that part over, lengthening it. I could still use the same bottom band shown here.

Sunday, September 18, 2011

Bieberfied

I thought I remembered being the mother of a baby. But it seems like there is no baby 'round here. He is a little boy now, and he's rocking the Bieber look. Sorta.

Photobucket
Yes, Daddy has hair envy and likes to spend time blow-drying and gelling Brock's hair.

Photobucket
Brock is 14 months old. He runs around like a pro. Well, actually, he falls down at least once every minute. I attribute much of this to the fact that he carries a receiving blanket everywhere he goes like Linus. This is a relatively new thing since I now allow him to have one in his bed when he sleeps. When he starts to fuss, I hand him the blanket, he pops his thumb in his mouth, and it's whimper, whimper ... breathe, breathe ... calm, calmmmm ... everything is better.

He also drags it on the floor and trips on it constantly. He doesn't really speak at all yet, other than "dad" "hi" and "hey." Mostly he points and says "Ss" if he wants something. I recall back to when my brother started to talk and then regressed, deciding it was easier to have your entire vocabulary be grunts and make everyone else decipher them. A few times it seems Brock has said "dat?" when he heard something that made him curious.

He has become the world's worst eater. We're down to fruit, lunch meat and oatmeal, mostly. Put something in his mouth he doesn't want, and he pushes it right back out down onto his shirt. The rest goes on the floor. Since I am also an irritatingly picky eater, I try to keep my patience.

He's also been picking up colds a lot (twice in a month) and teething his molars, so things have been a little rough. He's a trooper, though. No more play places where all the babies lick all of the items!

Saturday, September 10, 2011

"Who" hates owls? Me? Hmmm

I've always been a bit frightened of owls. They are creepy to me. Especially barn owls. But for some reason, despite the shudder factor, owls are unbelievably cute in cartoon form. My son's infant carrier, stroller and high chair are the Little Hoot print from Graco.

It wasn't until I was knitting up this hat for Brock's Halloween costume that I remembered my feelings of terror lack of fondness for owls. This hat, though, is not scary. And I'm sure Brock will make a very appealing owl.


 The pattern can be found for free at Hammer & Thread
For those on Ravelry, my project can be found here.


This project was cheap, quick and pretty easy, if you read directions. I made mistakes because I didn't read directions carefully enough.

It's much cuter on a baby's head, so I'll share some pictures of that later. I'm going to make him the wings out of felt. Brock is in a hat-refusal stage, so if I can just get a few pictures out of this, I'll be thrilled.

Friday, September 9, 2011

Last month, my brother and his family came from Maine for a very rare trip. We had to do more than our fair share of photos. Of course, our parents are divorced, so we ended up with two photoshoots.
This first one is done by my friend Sonya Cogan of Sonya Cogan Photography. I really like how the reeds look behind us and all of the color. She can also be found on Facebook.

These pictures are with my family, my brother's family and my mom.

All of us together


A couple of my mom with her grandkids. Brock is the only one she gets to see regularly.

Below are a bunch of Mark, Brock and me. Brock was sick and not his usual jovial self. He wanted to suck his thumb the entire time. Then there were the ants biting us...


The following pictures were taken with my dad and stepmom's side of the family. They involve my Dad and Vi, my stepsister Carlene, my stepsister Josette's kids (she had a delayed flight and didn't make it to the pictures), my brother and his family and the three of us. I don't know the photographer's name.


Dad and Vi with all of their grandkids, above.


The whole family, except my stepsister Josette, who had a delayed flight. Her kids are in the pic, though.

Mark, Brock and me.

The three of us with my dad and Vi.


This one is sweet!

Daddy and Brock

Ryan, Charity and their kids. (My bro)

All the grandkids, ages 1-19